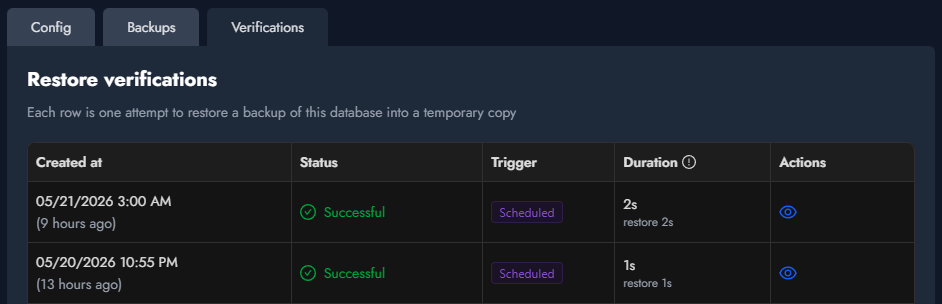
Restore verification
A backup that finishes without error is not the same as a backup you can actually restore. The only real proof is to restore it. Databasus does this for you on a schedule:
- takes the latest backup
- runs restore into a throwaway database container
- sanity-checks the restored database against the source
- tears the container down
- reports the outcome
What is a verification agent?
The verification agent is a small Go binary you run on a machine you control — anything with spare CPU, RAM and disk works. The agent registers with Databasus, picks up verification jobs from a queue, runs them locally and reports results back.
What you need
- A host with outbound HTTPS access to your Databasus URL.
- Docker available on that host — the agent spins up ephemeral database containers of the matching major version for each job.
- Disk capacity for each verification job covering the backup file size, the database raw size and a 5 GB safety gap on top.
- At least 1 CPU core and 512 MB of RAM available per concurrent job.
Why not just checksums?
Checksums and exit codes catch some failure modes but miss others entirely:
- Checksums catch bit rot on the archive file, but say nothing about whether the dump itself is complete or semantically valid.
- Dump exit code says the dump command ran. It does not catch a role missing read permissions on certain objects, a missing extension on the source or a tablespace mismatch — all of which can cause objects to be silently skipped or stripped.
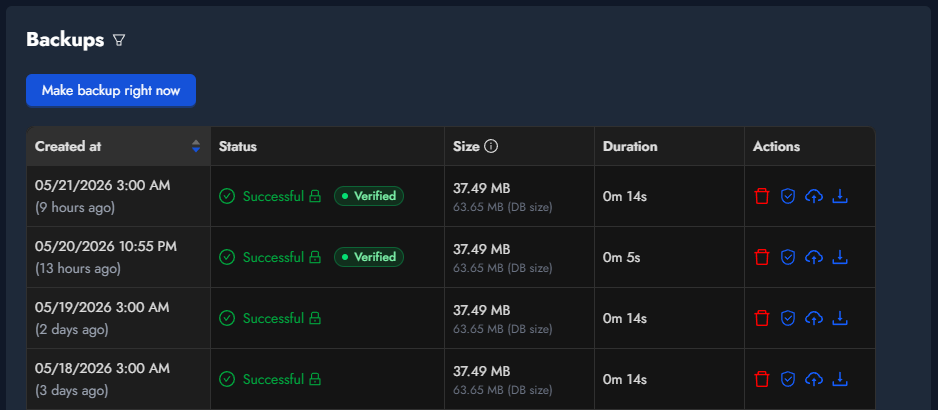
- Restore verification actually runs the archive through the database's native restore tool and counts rows per table. It is the only check that catches all of the above — if a backup will not restore, you find out before you need it, not during a disaster.
Configuration
Create an agent in the UI
Open Settings → Verification agents and click Create verification agent. Pick a descriptive name like staging-verifier or eu-west-host-1. The next dialog shows the agent's token and ID.
The token is shown exactly once — copy it before closing the dialog. If you lose it later, use the Rotate token action on the agent's row to issue a new one; the old token stops working on the agent's next heartbeat. The dialog that follows shows the install commands for your server's architecture — the same commands described below.
Launch the agent on your server
SSH into the machine that will run verifications. First, download the agent binary. Replace https://your-databasus-host with your own Databasus URL, and swap amd64 for arm64 if your server is ARM:
curl -L -o verification-agent "https://your-databasus-host/api/v1/system/verification-agent?arch=amd64" \
&& chmod +x verification-agentThen launch the agent. The agent ID and token come from the dialog in the previous step:
./verification-agent start \
  --databasus-host=https://your-databasus-host \
  --agent-id=<AGENT_ID> \
  --token=<TOKEN> \
  --max-cpu=2 \
  --max-ram-mb=2048 \
  --max-disk-gb=20 \
--max-concurrent-jobs=1start daemonises the agent and writes its flags to databasus-verification.json in the working directory, so later restarts can use ./verification-agent start with no flags at all. Logs are written to databasus-verification.log next to the binary.
The Databasus host must be https://. Plain HTTP is only allowed if you add --allow-insecure-http, and it is intended for local testing — never expose a production agent over unencrypted HTTP.
The four --max-* flags are budgets, not per-job allocations. The agent reports them to Databasus on every heartbeat, and Databasus divides them across the concurrent jobs you allow. With --max-cpu=2 --max-ram-mb=2048 --max-concurrent-jobs=1 the single job gets all 2 CPUs and 2 GB of RAM. With --max-concurrent-jobs=2, each job gets 1 CPU and 1 GB. The floor is 1 CPU and 512 MB per job — if your budget can't satisfy that floor, the agent advertises lower concurrency. The disk budget is the easiest to get wrong: each job needs enough space for the backup file size, the database raw size and a 5 GB safety gap on top, so set --max-disk-gb comfortably above that for your largest database.
Manage the agent
The same binary provides four subcommands:
./verification-agent status— show whether the daemon is running and what jobs it is currently working on../verification-agent stop— stop the daemon. In-flight verifications are reported back to Databasus as failed and are re-queued../verification-agent start— re-launch the daemon. Flags are remembered from the first start; pass--token=<NEW>after a rotation to update the stored token../verification-agent run— run in the foreground instead of as a daemon. Use this when wrapping the agent in a systemd unit or a Docker container — those supervisors expect the process not to fork off.
The Settings page shows three icon actions on each agent's row: view the install commands again (without revealing the token), rotate the token, and delete the agent. Deleting is safe — any verifications currently assigned to that agent are returned to the queue and picked up by another agent if one is available.
Schedules and notifications
Restore verification is configured per database. Open the database's verification settings, toggle on Scheduled verification, then pick an interval.
Interval options
- After backup — strongest guarantee: every successful backup is verified the moment it finishes.
- Hourly, daily, weekly, monthly — pick a cadence and a time of day.
- Cron — a UTC cron expression for anything the presets don't cover. Examples:
0 4 * * 0(every Sunday at 4:00 AM UTC) and0 */6 * * *(every six hours).
How the queue handles "After backup"
A verification is usually slower than the backup that produced it, so if backups arrive faster than verifications finish, the queue would grow forever. Databasus avoids this by cancelling any pending verification for the same database whenever a fresh backup arrives — only the most recent backup waits in line. The trade-off is intentional: it is better to skip a verification of a stale backup than to spend hours verifying something you'd never restore from anyway.
Manual runs
You can also kick off a one-off verification from the database's Restore verifications tab without changing the schedule. Useful for spot-checking a specific backup or smoke-testing a new agent end-to-end before you trust it with the scheduled load.
Notifications
Success and failure can be sent through any notifier already wired up for the database. The two checkboxes — Verification success and Verification failed — are independent. Most teams enable only the failure one to avoid notification fatigue. See the notifiers documentation to wire up Slack, Microsoft Teams, Discord, email, and others.
Reading the results
Each verification attempt shows up as one row in the database's Restore verifications tab. The status is one of Pending, Running, Successful, Failed or Canceled. Clicking a row opens a drawer with the full timeline, the restore exit code, the restored database size, schema and table counts, and a per-table row-count breakdown. Failed runs show the failure message at the top of the drawer.